Installation & setup
Noxia connects to your agent as a remote MCP service, and its clinical workflow comes from a set of companion Skills. There are two ways to set that up:
- In an agent app — no terminal, no commands. You paste one paragraph, click one authorization button, and you’re done. This is the recommended path if you’re a clinical geneticist rather than a developer.
- In the terminal — full control over the model provider and the project layout. Recommended if you’re comfortable on the command line.
Quick setup in an agent app
This path uses an agent application with a graphical interface. The steps and screenshots below use WorkBuddy, but the same three steps apply to any agent app that supports MCP connectors and Skills.
All you need is a Noxia account and an agent app already installed. The agent does the rest.
1. Paste the setup instruction
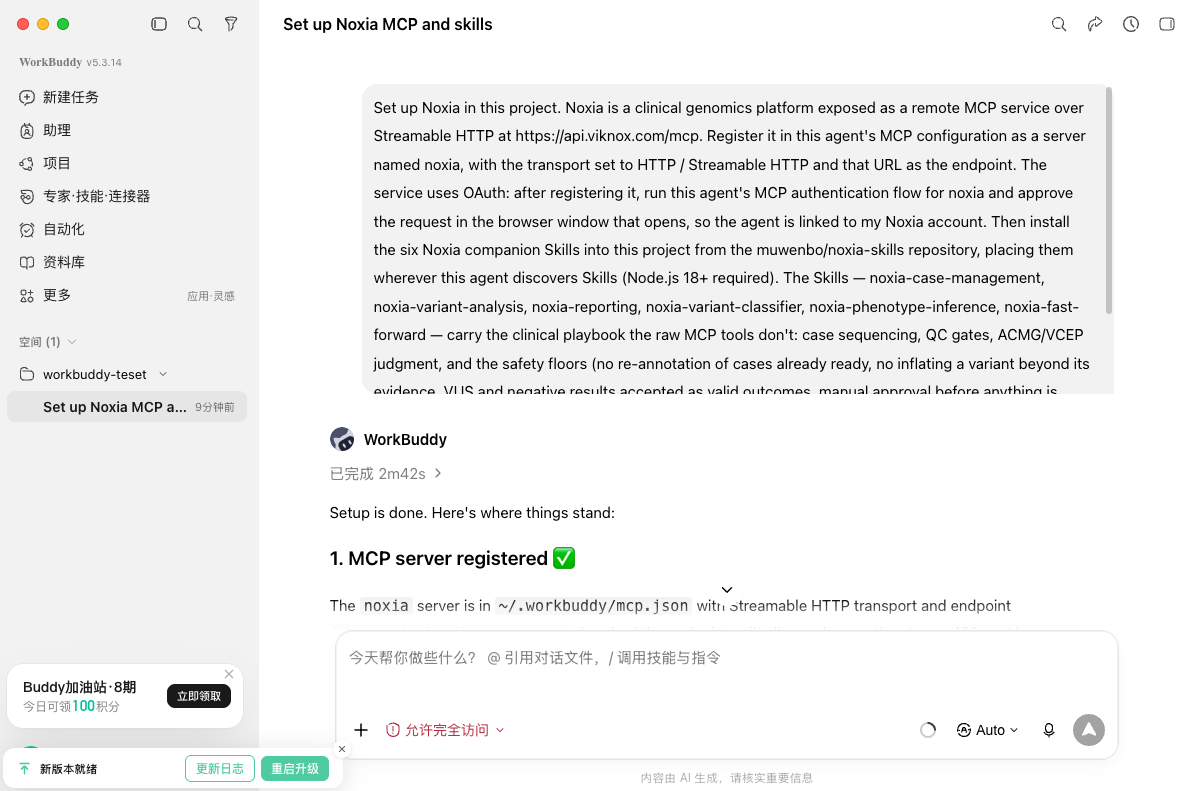
Start a new task in the agent app and paste the following paragraph as your first message:
Set up Noxia in this project. Noxia is a clinical genomics platform exposed as a
remote MCP service over Streamable HTTP at https://api.viknox.com/mcp. Register it
in this agent's MCP configuration as a server named noxia, with the transport set to
HTTP / Streamable HTTP and that URL as the endpoint. Then install the six Noxia
companion Skills from the muwenbo/noxia-skills repository, placing them wherever this
agent discovers Skills (Node.js 18+ required): noxia-case-management,
noxia-variant-analysis, noxia-reporting, noxia-variant-classifier,
noxia-phenotype-inference, noxia-fast-forward. When you are done, list the noxia MCP
tools and the Skills you loaded, and tell me what I still need to authorize myself.
The agent registers the MCP server and installs the Skills on its own. This usually takes two to three minutes.
2. Authorize the connector
The agent can’t grant itself access to your Noxia account — you have to approve that once, by hand:
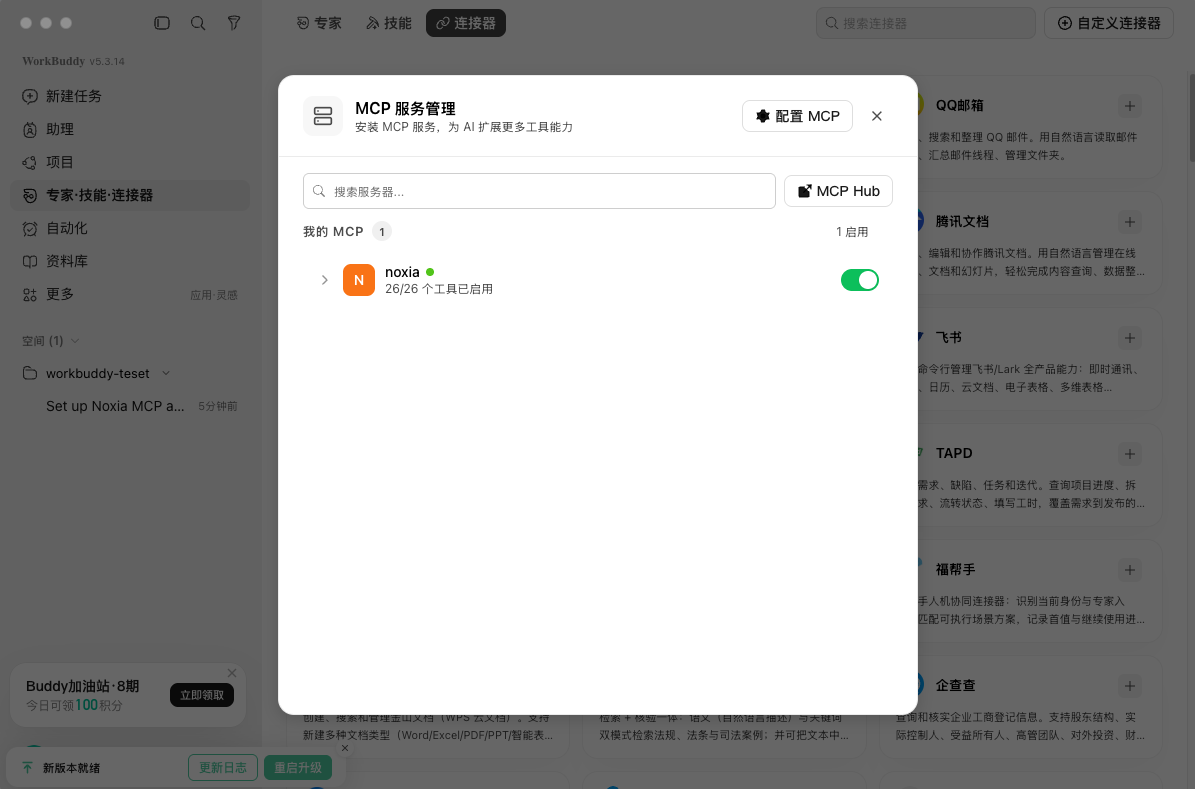
- Open the agent app’s connector management page and find the noxia entry in the custom / MCP connector area.
- Click Trust (or Authorize). A browser window opens on Noxia’s authorization page.
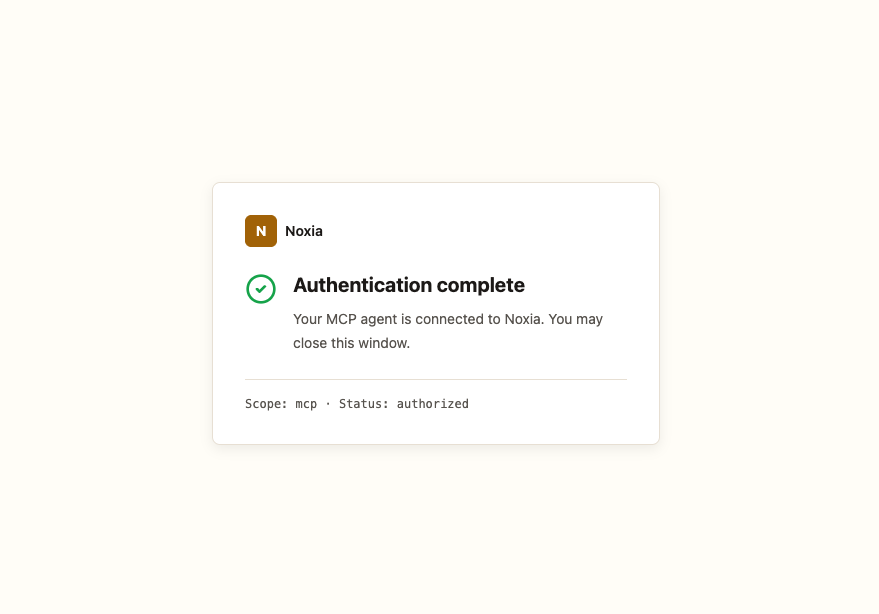
- Approve the request there. Noxia confirms with Authentication complete, and you can close the window.
3. Verify the connection
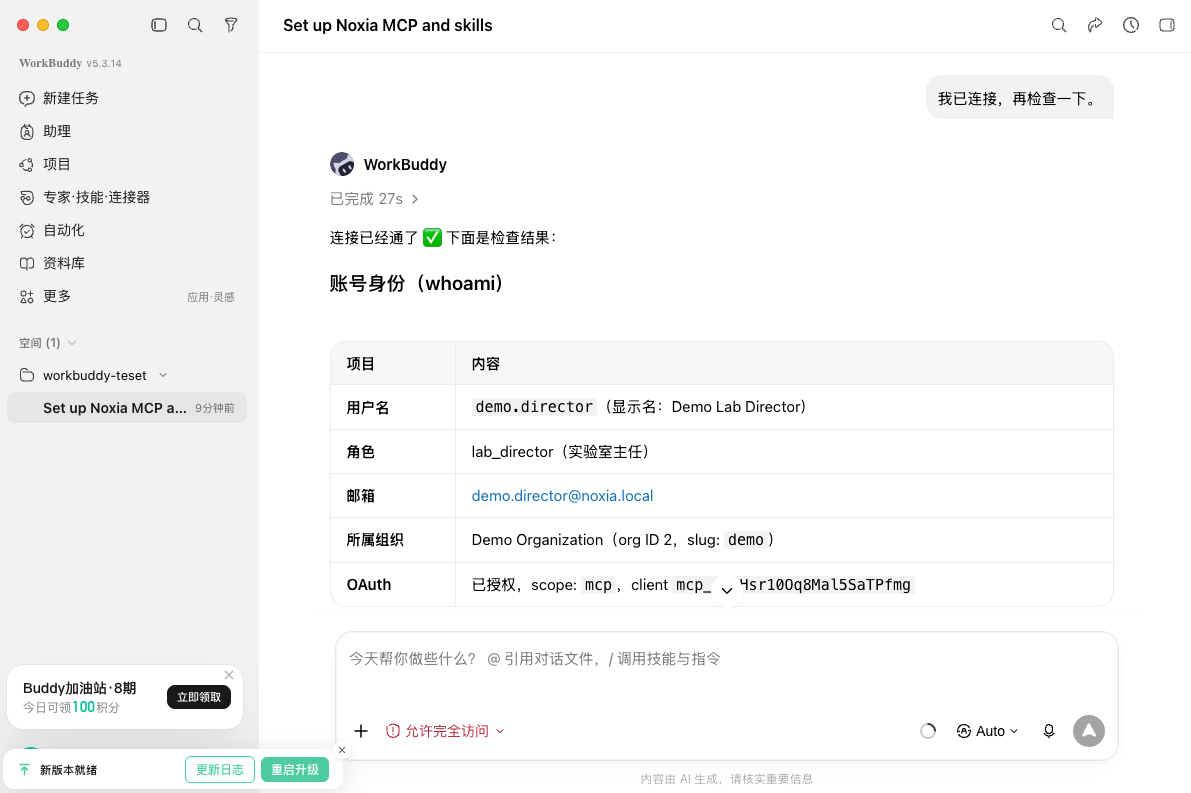
Go back to the session and ask the agent to check again:
I’ve connected it now — please re-check.
It should report your Noxia account identity: username, role, email, organization, and an OAuth status of authorized. If it does, your setup is complete — head to the Playground and run your first analysis on our sample data.
Terminal setup
The rest of this page covers the command-line path, which sets up the environment Noxia needs on macOS or Windows. The example below uses Claude Code as the agent tool and takes about 5 minutes from start to finish.
New to the terminal? We recommend the CCSwitch GUI tool, which lets you complete steps 2 and 5 below without typing any commands.
Prerequisites
- A Noxia account (used to authorize access in step 6).
- Node.js 18 or later installed (needed for
npxwhen installing the Skills in step 4; also needed if you install Claude Code via npm).
1. Install the agent tool (Claude Code)
macOS / Linux:
curl -fsSL https://claude.ai/install.sh | bashWindows (PowerShell):
irm https://claude.ai/install.ps1 | iexOr use npm (cross-platform):
npm install -g @anthropic-ai/claude-codeOnce installed, verify the version:
claude --version2. (Optional) Configure a custom model API
If you don’t have a Claude subscription, you can connect Claude Code to a third-party LLM that is compatible with the Anthropic API (such as DeepSeek, Qwen, and others). We recommend doing this in Claude Code’s config file: edit ~/.claude/settings.json (on Windows, C:\Users\<username>\.claude\settings.json; create the file if it doesn’t exist) and, under env, fill in the endpoint, key, and model names your provider supplies.
Using DeepSeek as an example:
{
  "env": {
    "ANTHROPIC_BASE_URL": "https://api.deepseek.com/anthropic",
    "ANTHROPIC_AUTH_TOKEN": "sk-your-API-Key",
    "ANTHROPIC_MODEL": "deepseek-v4-pro",
    "ANTHROPIC_DEFAULT_OPUS_MODEL": "deepseek-v4-pro",
    "ANTHROPIC_DEFAULT_SONNET_MODEL": "deepseek-v4-pro",
    "ANTHROPIC_DEFAULT_HAIKU_MODEL": "deepseek-v4-flash"
  }
}
What each field means:
ANTHROPIC_BASE_URL: your provider’s Anthropic-compatible endpoint.ANTHROPIC_AUTH_TOKEN: the API key you obtained from that provider.ANTHROPIC_DEFAULT_OPUS_MODEL/ANTHROPIC_DEFAULT_SONNET_MODEL/ANTHROPIC_DEFAULT_HAIKU_MODEL: map Claude’s Opus / Sonnet / Haiku tiers to your provider’s specific models; Claude Code automatically picks the matching tier based on task complexity.
For the exact endpoint, key, and available model names, refer to your provider’s documentation (see the Alibaba Cloud Model Studio integration example). Save the file and restart claude for the changes to take effect.
Don’t want to edit the config file by hand? CCSwitch provides a GUI for switching between model providers with one click.
3. Start Claude Code
Open a terminal, change into your project folder, and start it:
cd /path/to/your-project
claude
To skip per-action permission prompts during a session, add this flag (use it only in projects you trust):
claude --dangerously-skip-permissions4. Install the Noxia companion Skills
In your project root, use the skills tool to install the Noxia companion Skills in one step:
npx skills add muwenbo/noxia-skills -a claude-codeThis command installs all of the Skills from the noxia-skills repository into the .claude/skills/ directory, and Claude Code discovers them automatically. See the Skills overview for what each Skill does and how they fit the workflow.
5. Configure the Noxia MCP service
Noxia exposes its capabilities as an MCP service over Streamable HTTP. In your project directory, run:
claude mcp add --transport http noxia https://api.viknox.com/mcpYou can also simply tell Claude Code in the session:
Set up a Streamable HTTP-based Noxia MCP service in this project, at
https://api.viknox.com/mcp.
6. Authorize access to your Noxia account
In the Claude Code session, type:
/mcpSelect noxia → Authenticate in turn. A browser authorization window will open—click Allow to grant Claude Code access to your Noxia account.
7. Get started
Your environment is ready. Now head to the Playground and start your first variant analysis with the sample data we provide.